How Do You Erase a Computer Hard Drive Securely

Thinking you can just drag files to the trash or run a quick format on a drive is one of the most common—and dangerous—mistakes people make. When you "delete" a file, the operating system doesn't actually erase it. It just removes the pointer to the file's location, essentially marking that space as "available."
The data itself—your tax returns, client lists, or family photos—is still physically there. It hangs around, invisible to you but fully recoverable with simple software, until it happens to be overwritten by new data. That's a huge risk.
This is why a formatted drive sold on eBay or donated to a charity can easily become a goldmine for an identity thief. For a business, this kind of oversight can snowball into a catastrophic data breach, leading to hefty fines and a public relations nightmare. The only real way to protect yourself is through a deliberate process called data sanitization. To really dig into what that means, check out our complete guide on what is data sanitization.
The Core Methods of Secure Erasure
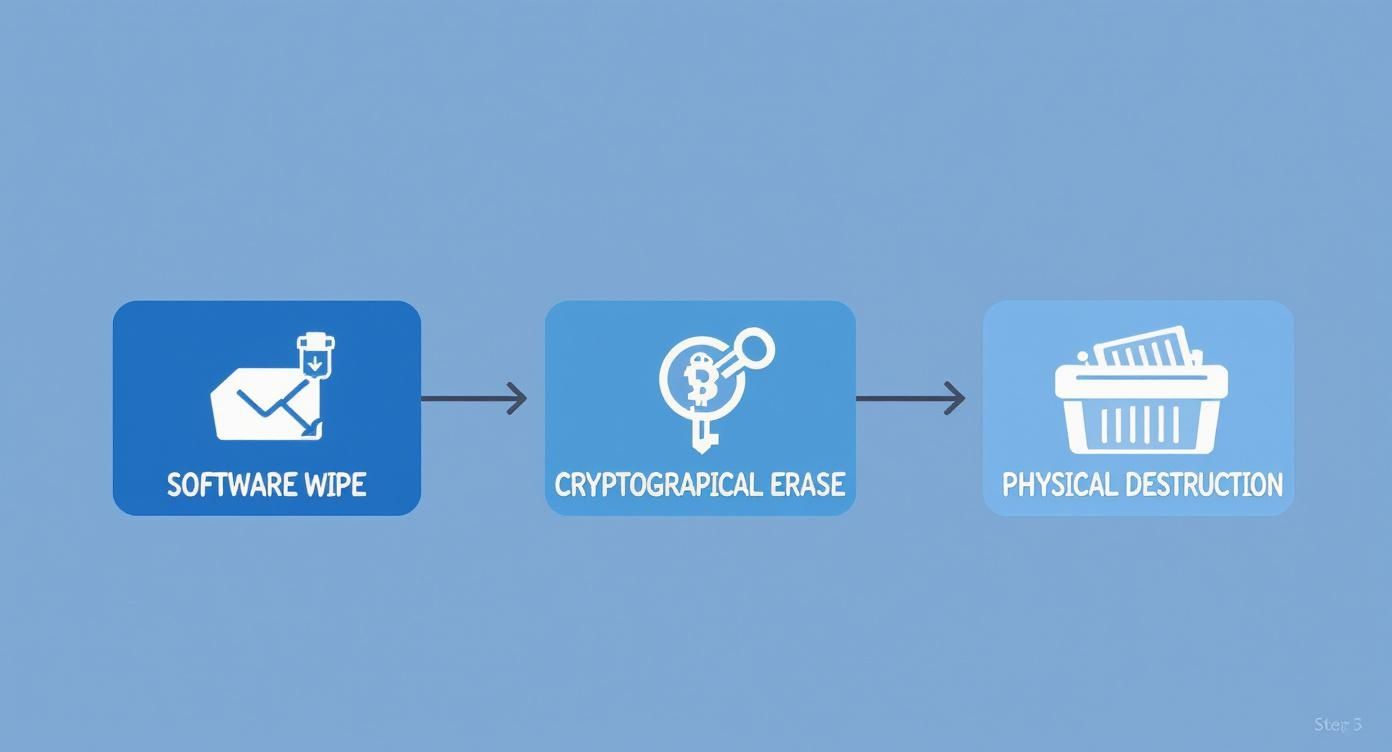
When you truly need to erase a computer hard drive, you have to choose a method that makes the data gone for good—permanently irretrievable. It really boils down to three main approaches, and the right one depends on your needs and the type of drive you have.
- Software Wiping: This is where you use a specialized program to write random, meaningless data over every single part of the drive. It’s a solid method for drives you plan to reuse, sell, or donate.
- Cryptographic Erasure (Crypto-Erase): This is the go-to for modern self-encrypting drives (SEDs). It's incredibly fast and secure. Instead of wiping the data, you just delete the unique encryption key. Without the key, the data is just a useless scramble of digital noise.
- Physical Destruction: This is the final answer. We're talking about shredding, crushing, or degaussing (using powerful magnets) to physically demolish the drive's platters or memory chips. It’s the only guaranteed method for drives that are old, broken, or held the most sensitive information imaginable.
For a quick breakdown, here’s how these methods stack up against each other.
Data Erasure Methods at a Glance
This table gives you a quick comparison of the primary methods for erasing a hard drive, their effectiveness, and where they make the most sense.
| Method | How It Works | Best For | Is Drive Reusable |
|---|---|---|---|
| Software Wiping | Overwrites all data sectors with random characters, often in multiple passes. | Reusing or reselling older HDDs; ensuring data is unrecoverable by software tools. | Yes |
| Cryptographic Erasure | Deletes the encryption key, instantly rendering all encrypted data on the drive unreadable. | Modern SSDs and SEDs that are being repurposed or resold. The fastest secure method. | Yes |
| Physical Destruction | The drive is shredded, crushed, or melted, physically destroying the storage components. | Damaged drives, end-of-life hardware, or drives with highly classified information. | No |
Choosing the right path is all about balancing your security needs with whether you want the drive to have a second life.
HDDs vs. SSDs: A Critical Distinction
How you tackle data erasure also depends heavily on whether you’re dealing with an old-school Hard Disk Drive (HDD) or a modern Solid-State Drive (SSD).
HDDs store data on spinning magnetic platters, and a thorough software overwrite works perfectly. SSDs are a different beast. They use flash memory and have complex "wear-leveling" features that can shuffle data around, sometimes leaving fragments behind even after a software wipe.
Because of this, cryptographic erasure or physical destruction are the most reliable methods for SSDs. But no matter which type of drive or erasure method you use, the most important step comes first: back up any data you need to keep. Once a drive is properly sanitized, that data is gone forever.
Choosing Your Erasure Method: Software Wipe vs. Physical Destruction
Deciding how to erase a computer hard drive is the most critical choice in the entire data sanitization process. It really all boils down to two key questions: Do you need the drive to work afterward, and what level of security does your data demand?
Let's break down the real-world scenarios for each method, from software wiping for reuse to the absolute finality of physical destruction.
When Reuse Is the Goal: Software Wiping
Software wiping is the go-to method when a drive has a future. The process involves overwriting every bit of existing data with random, meaningless information. Imagine painting over a canvas so thoroughly that no trace of the original image could ever be recovered. That's what tools like the industry-staple DBAN (Darik's Boot and Nuke) are designed for.
A single, verified overwrite pass is all you need to meet rigorous standards like NIST 800-88 Purge. That old advice about doing multiple passes—like the 3-pass DoD standard—was for much older hard drive technology. On modern drives, one complete pass is sufficient and saves a ton of time.
The biggest benefit here is obvious: the hard drive remains perfectly functional. This makes software wiping the ideal choice if you plan to:
- Donate computers to a school or nonprofit.
- Resell used IT equipment to recoup some value.
- Repurpose older machines for less critical tasks within your own organization.
For End-of-Life Drives: Physical Destruction, the Only 100% Guarantee
Sometimes, a hard drive has reached the end of its life, or it held information so sensitive that you can't accept even the slightest risk. In these cases, physical destruction is the only path forward. And no, we're not talking about taking a hammer to it in the parking lot. This involves industrial-grade processes that render the storage media completely destroyed and unrecoverable.
The two primary methods are degaussing and shredding.
Degaussing uses an incredibly powerful magnetic field to instantly scramble the magnetic patterns on a traditional HDD's platters. It's a fast way to obliterate data, but it's old-school tech for old-school drives. Degaussing is totally ineffective against modern solid-state drives (SSDs), which store data on flash memory chips, not magnetic platters. If you're curious about the science, we did a deep dive into erasing hard drives with magnets and if it actually works.
Shredding is the universal, failsafe solution. An industrial shredder grinds the entire drive—whether it's an HDD or an SSD—into tiny fragments, physically obliterating the platters and memory chips. This is the gold standard for compliance, especially for industries governed by HIPAA or financial regulations.
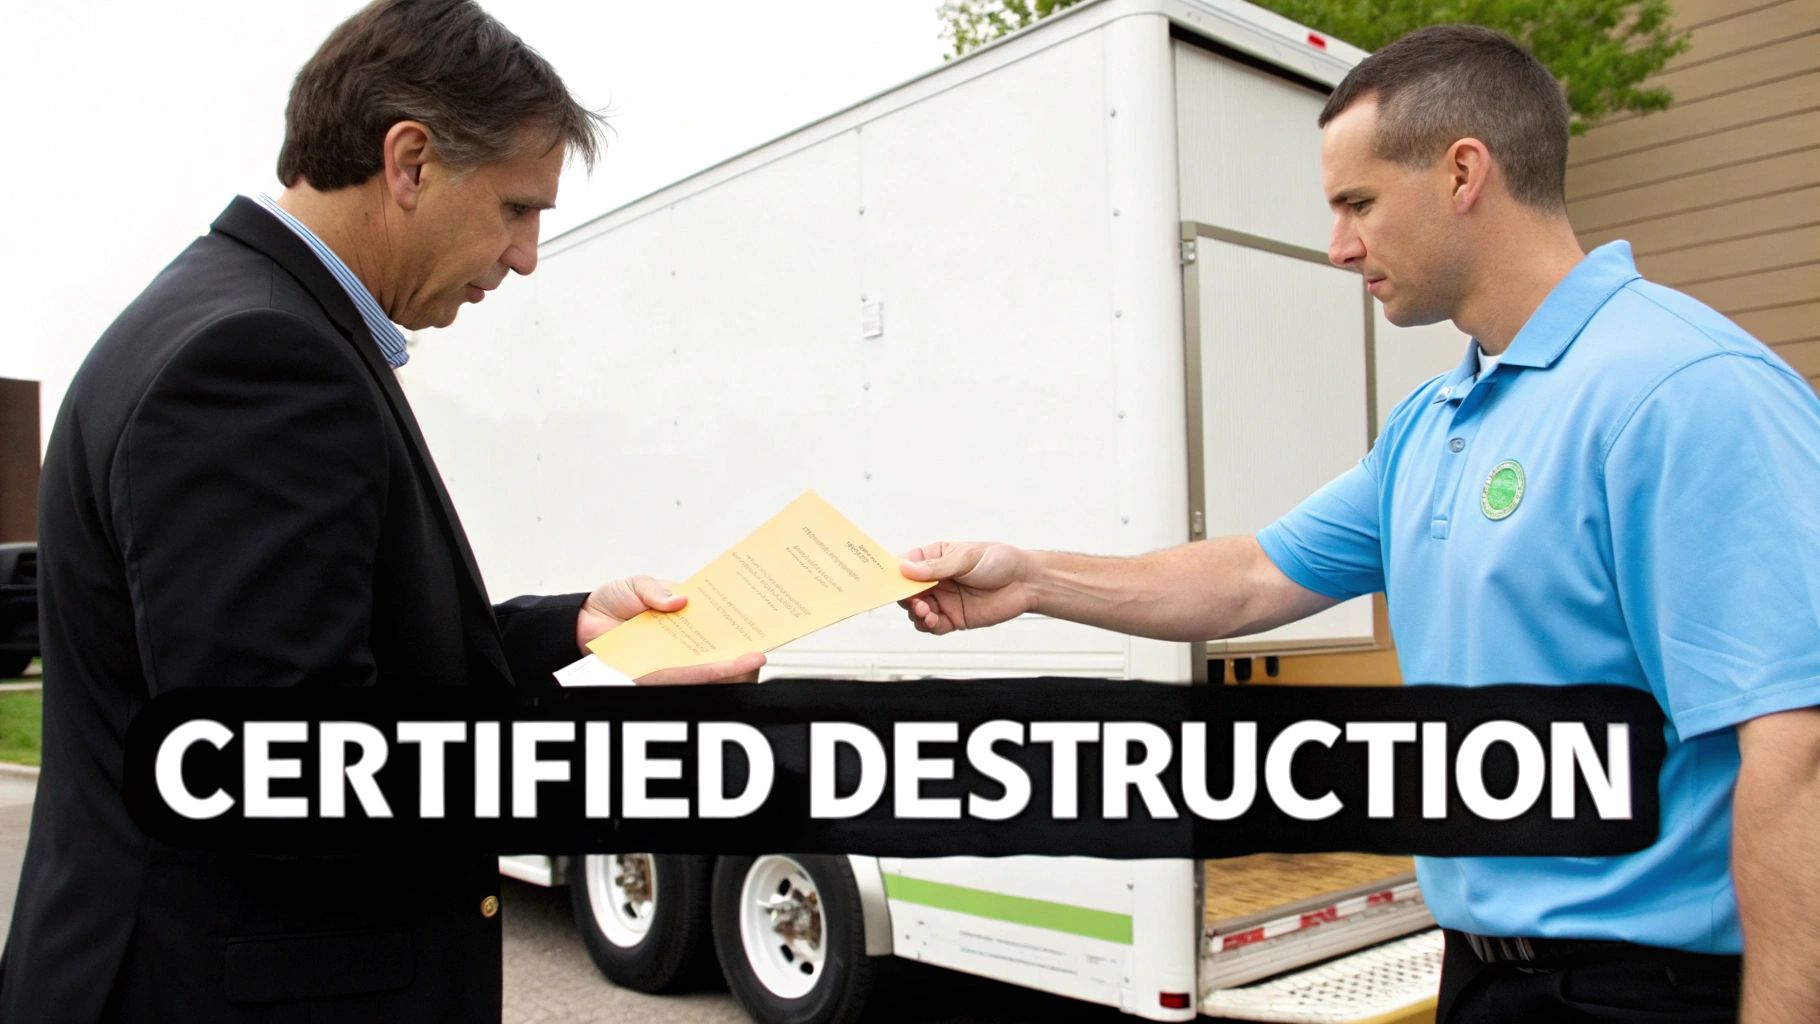
For any business, a Certificate of Destruction is non-negotiable. This is the official document provided by a certified vendor like GreenAtlanta.com that serves as your legal proof of compliant data destruction. It's what protects you in an audit.
The Modern SSD Solution: Cryptographic Erasure
There’s a third, much faster method perfectly suited for modern drives: Cryptographic Erasure (Crypto-Erase). Most new SSDs are actually self-encrypting drives (SEDs) right out of the box. They encrypt every piece of data written to them by default, using a unique encryption key stored right on the drive itself.
Instead of spending hours overwriting terabytes of data, a crypto-erase simply deletes that one tiny key. Instantly, all the data on the drive becomes permanently inaccessible—a completely useless jumble of ciphertext. It's by far the fastest and most efficient way to sanitize an SSD you plan to reuse.
A Practical Walkthrough of Wiping a Hard Drive with Software
So, you’ve decided that software wiping is the right move. Good. It’s time to roll up your sleeves. While the process might sound overly technical, using a tool like the well-regarded (and free) Darik's Boot and Nuke (DBAN) is surprisingly straightforward once you get the hang of it.
This isn't just about clicking a button; it's about confidently and permanently erasing a computer's hard drive. Let's walk through the essential phases.

Before you download a single file, there is one absolutely non-negotiable first step: back up your data. Once a drive is properly wiped, there's no "undo" button. Seriously. Every document, photo, and file will be gone for good, so make sure anything you want to keep is safely stored on an external drive or in the cloud.
Preparing Your Bootable Wipe Tool
Most data erasure tools, including DBAN, don't run from inside Windows or macOS. You can't wipe the floor you're standing on, right? Instead, you have to create a "bootable" USB drive that lets your computer start up using the wiping software itself.
- Download the Software: First, grab the DBAN ISO file from its official source. An ISO file is essentially a perfect digital copy of a disc, which you'll use to create your bootable drive.
- Get a USB Flashing Tool: You'll need a small utility to write that ISO file to a USB drive correctly. For Windows users, Rufus is a popular, reliable, and free option that gets the job done.
- Create the Bootable USB: Plug in a blank USB drive (at least 1GB will do) and fire up Rufus. Select your USB drive, click "SELECT" to find the DBAN ISO file you downloaded, and hit "START." Just let it do its thing.
Once that's finished, you're holding a powerful data destruction tool.
A word of caution: The moment you boot from this USB, you are in a high-stakes environment. Double-checking every selection is critical, as one wrong move could wipe the wrong drive and lead to irreversible data loss.
Executing and Verifying the Wipe
Alright, this is the main event. Shut down the computer completely and plug in your newly created bootable USB drive. You'll need to tell the computer to boot from this USB instead of its internal hard drive.
This usually means pressing a specific key right as the computer starts up—often F2, F12, or DEL—to get into the BIOS or Boot Menu. From there, just select your USB drive as the primary boot device. Once you do, the DBAN interface will pop up.
While we're focused on computer hard drives here, the same core ideas apply to other devices. For instance, you can find a solid guide on how to reset an iPhone to factory settings to securely erase its data.
Back in the DBAN software, you’ll see a list of all detected hard drives. This is the most crucial moment of the entire process.
- Identify the Correct Drive: Pay close attention and identify the exact drive you want to wipe based on its size and model name. If you have any doubt, stop immediately. It’s a great idea to unplug any external drives you aren't wiping to avoid a catastrophic mistake.
- Select the Drive and Method: Use your keyboard's arrow keys to navigate and press the spacebar to select the target drive. A single-pass wipe (like the
dodshortmethod in DBAN) is more than enough for modern drives and lines up with NIST standards. - Initiate the Wipe: Once you've double-checked your selections, press the F10 key to kick things off. Be patient; this can take several hours, depending on the drive's size and speed.
- Verify Completion: The software will give you a clear confirmation message when it's done. A green "DBAN succeeded" screen means every bit of data on that drive has been overwritten and is now unrecoverable.
If you're working with a laptop, the process is nearly identical, but you can review our dedicated guide on how to clear a laptop hard drive for more specific tips.
Troubleshooting Common Issues
Even with careful prep, things can go sideways. Here are a couple of common hiccups I've seen and how to fix them:
- Computer Won't Boot from USB: This is almost always a BIOS setting. Look for an option called "Secure Boot" in your BIOS and disable it. This feature often prevents booting from external devices as a security measure.
- Drive Not Recognized: If the software can't see your hard drive, it might be a connection issue or a drive controller setting in the BIOS. Try switching the SATA mode from AHCI to IDE/Compatibility mode, or vice versa.
- Wipe Fails or Freezes: A wipe that keeps failing or gets stuck can be a red flag that the hard drive itself is physically dying. If the process repeatedly hangs at a certain percentage, the drive is probably beyond software repair and should be physically destroyed instead.
Understanding Data Destruction Standards and Compliance
Simply erasing a computer hard drive is only half the job, especially if you're a business. The other, arguably more critical half, is proving you did it correctly and can stand up to an audit. This is where data destruction standards and compliance protocols come in, turning a technical task into a documented, defensible business process.
Following these standards isn't just about wiping a drive; it's about insulating your company from staggering fines, legal headaches, and the kind of reputational damage that's hard to shake. Adherence to recognized standards is often guided by internal data privacy policies, but without this formal framework, you're really just flying blind and hoping for the best.
NIST SP 800-88: The Modern Gold Standard
For years, the old Department of Defense (DoD) 5220.22-M standard was the one everyone talked about. The problem is, its multi-pass overwriting methods are ancient history and completely inefficient for today’s drive technology, especially SSDs.
Today, the undisputed industry benchmark is NIST Special Publication 800-88, "Guidelines for Media Sanitization."
NIST 800-88 ditches the one-size-fits-all approach for a smarter, risk-based methodology. It introduces the concept of "sanitization" and breaks it down into three distinct levels of action:
- Clear: This involves using logical techniques, like overwriting the media with new data. It's designed to stop simple, non-invasive recovery attempts and is done using standard read/write commands. Think of it as the baseline for low-risk data.
- Purge: This level steps things up significantly, protecting data from being recovered even with advanced, lab-based forensic tools. Methods here include cryptographic erasure, block erasing, and more intensive overwriting. For most corporate scenarios where a drive might be reused, hitting the NIST Purge level is the goal.
- Destroy: This is the final answer. It renders the media totally unusable and beyond repair. We're talking about physical destruction methods like shredding, disintegration, or even melting—it provides the absolute highest level of security because the drive simply ceases to exist.
If you're looking for a broader view on how this fits into the entire lifecycle of retiring company hardware, our guide on what is IT asset disposition offers some crucial perspective.
Major Regulations and Why They Matter
Depending on your industry, you're governed by specific laws that dictate exactly how you must handle sensitive information when it's time to retire the hardware it lives on. Knowing which rules apply to you is non-negotiable.
Here are a few of the heavy hitters you need to be aware of:
- HIPAA (Health Insurance Portability and Accountability Act): A major one in the US healthcare space. It legally requires that all protected health information (PHI) be rendered completely unreadable, undecipherable, and non-reconstructible.
- FACTA (Fair and Accurate Credit Transactions Act): Aimed at preventing identity theft, this law mandates that businesses properly destroy consumer information before discarding it.
Getting this wrong isn't an option. Failing to comply can lead to severe financial penalties and legal action that no organization wants to face.
The Role of Documentation and Chain of Custody
You can follow every technical step to the letter, but if you don't have the paperwork to back it up, it might as well have never happened in the eyes of an auditor. This is precisely why a Certificate of Destruction (CoD) is one of the most vital documents in this entire process.
A Certificate of Destruction is your formal, official audit trail. It details what was destroyed, when, where, by what method, and confirms compliance with specific standards. This piece of paper is your legal safeguard, effectively shifting liability from your organization to your certified destruction partner.
This documentation is a cornerstone of the chain of custody—a chronological paper trail that meticulously tracks the seizure, custody, control, transfer, and final disposition of your hardware. A secure chain of custody guarantees that from the moment a drive leaves your hands to the second it's destroyed, it is accounted for and secure.
When to Trust a Professional for Secure Data Destruction
Going the DIY route to wipe a personal hard drive is one thing. But when you’re responsible for a whole office full of devices, that approach just doesn’t cut it. Managing dozens, or even hundreds, of computers introduces massive risks. Think about it: human error, drives that aren't actually wiped, and zero auditable proof for compliance.
At that scale, calling in a professional data destruction service isn't a luxury—it's a core business function for any Atlanta company. A single slip-up can lead to a data breach, and that's why targeting keywords like "corporate sustainability electronics disposal" and "electronics recycling for veterans" is part of a smart, secure strategy.
Why Professional Services Are the Only Real Option for Businesses
If your organization handles any kind of sensitive data, the stakes are simply too high to leave things to chance. A recent survey showed that 56% of IT professionals wrongly believe that a standard format permanently erases data. That's a dangerous misconception that leaves confidential information just waiting to be recovered.
Professional services take the guesswork out of the equation, providing a compliant, documented, and guaranteed process. At GreenAtlanta.com, we offer both on-site and off-site hard drive shredding, ensuring your data is physically obliterated and making recovery impossible. This process is the foundation for an easy ESG win for our corporate partners.
Turning E-Waste into a Force for Good: A “Recycle for a Cause” Campaign
Choosing a partner for data destruction doesn't have to be a simple transaction. It can be a core part of your Corporate Social Responsibility (CSR) and ESG goals. Our dual philanthropic impact—supporting veterans and planting trees—transforms your end-of-life IT into a powerful story. It's a mission we call “Recycling That Restores Lives and Landscapes.”
Your old tech can house a veteran and grow a forest. This isn’t just recycling; it’s a tangible way to demonstrate your company's commitment to the community and the environment. We help businesses achieve their sustainability benchmarks by turning e-waste into hope.
A Secure Process with a Purpose
Our entire process is designed around the needs of an Atlanta business, ensuring total compliance and peace of mind. By partnering with local VFW chapters and environmental nonprofits, we amplify your impact right here in our community.
Here’s what you can expect when you partner with us:
- Secure On-site and Off-site Shredding: We offer free pickup for 50+ devices and can bring our mobile shredding truck to your Atlanta facility or transport assets in locked containers to our secure plant.
- Complete Chain-of-Custody Documentation: From collection to destruction, every move is documented, providing a defensible audit trail.
- Certificates of Destruction and Impact: You’ll get a formal Certificate of Destruction for compliance, plus a Veteran Support Impact Report and Plant-A-Tree certificates for your CSR documentation. Partners also receive our digital “Recycled with Purpose” eco-badge to display their commitment.
For more details on our secure and impactful solutions for Atlanta tech recycling, check out our hard drive destruction services near you.
Common Questions About Erasing Hard Drives
When it comes to data destruction, there's a lot of confusion out there. Getting the right answers is non-negotiable, whether you’re wiping a single home computer or decommissioning an entire data center. We get these questions all the time, so let's clear up some of the most common ones.
Does a Factory Reset Erase My Hard Drive?
In a word, no. This is probably the single biggest misconception we see. A factory reset is designed to return your operating system to its out-of-the-box state, which means it removes your programs and personal settings.
But here’s the critical part: it doesn't actually overwrite the space where your files were stored. Someone with basic data recovery software could easily pull sensitive information off a drive that's only been reset. For real security that meets any kind of compliance standard, you have to use a proper software wiping tool or physically destroy the drive. There's no middle ground.
Is It Safe to Sell a Computer After Wiping the Hard Drive?
It certainly can be, but it all comes down to how it was wiped. If you've used a professional software tool that overwrites the drive according to a recognized standard like NIST 800-88 and gives you a verification certificate, then yes, it's generally safe for resale or donation. That process makes the data unrecoverable through software.
However, if that machine ever handled highly sensitive corporate data, protected health information (PHI), or valuable intellectual property, the only 100% foolproof method is physical destruction. Shredding the drive takes any and all risk off the table, period.
How Is Erasing an SSD Different from an HDD?
This is where things get more technical. Wiping a traditional spinning hard disk drive (HDD) is fairly straightforward; the software writes over the magnetic platters from beginning to end. Solid-State Drives (SSDs), on the other hand, are a different beast entirely.
SSDs use complex flash memory management techniques like wear-leveling and over-provisioning to distribute data and prolong the drive's life. A standard wipe might miss data fragments hidden in these managed areas. Because of this, your best options for an SSD are:
- Cryptographic Erase: If the drive is self-encrypting (most modern ones are), you can simply delete the encryption key. This instantly renders all the data on the drive complete gibberish.
- Manufacturer Secure Erase: Most SSD manufacturers provide their own utility designed to securely wipe their specific drive architecture.
- Physical Shredding: As always, this is the ultimate failsafe. It completely destroys the memory chips, leaving nothing behind to recover.
What Is a Certificate of Destruction and Why Do I Need One?
A Certificate of Destruction is a formal, legally binding document you receive from a certified data destruction partner like GreenAtlanta.com. Think of it as your official proof and audit trail.
This certificate is your documented evidence that your hard drives and other media were destroyed in full compliance with data privacy laws like HIPAA, FACTA, or GDPR. For any business, this piece of paper is crucial for proving due diligence, limiting liability, and satisfying auditors. It formally transfers the chain-of-custody responsibility from your organization to us.
Working with a professional partner not only keeps you compliant but can also reflect your company's values. Through our “Recycle for a Cause” program, your retired tech can support veterans and help plant trees, transforming a necessary security task into a positive community impact. Individual donors even receive a personalized certificate showing the impact they made.
When your Atlanta business needs certified, secure, and socially responsible data destruction, you need a partner you can trust. At GreenAtlanta.com, we provide a fully documented chain of custody and help turn your e-waste into a win for our community and the environment. Schedule your secure electronics recycling pickup today.